Create Great Looking QSL Cards!

Have you ever wanted that special and unique QSL card? With digital photography, it is easier than you might think. The following article will describe how you can make a high quality QSL card from a digital photograph.
Before you begin, decide how you are going to lay out your QSL card. Will the QSO information be on the bottom, top, or side? Will the subject be off to one side, or in the middle?
Once you decide on the layout of your QSL card, take a digital photograph of the subject. If you have a camera that takes images greater than 3 megapixels, you may have to reduce the resolution. It has been my experience that images greater than 2000 pixels wide will result in the text being too small when printed at the 3.5" X 5.5" format, even when the largest font sizes are used. An image that is 2000 pixels wide and 1270 Pixels tall will create and image that is 5.5" wide and 3.5" tall. This is the maximum resolution that will yield results with text being of adequate size. Once the photograph is taken, convert it to .BMP format. If you manipulate the image in .JPG format, slight changes are made every time you save your work due to the compression that is used. Refer to figure 1. for an example original image, shown smaller than actual size. Be sure to save your work after every operation. If you make a mistake, you can go back and do it again. It is advisable to use a different file name just in case you have to start over.
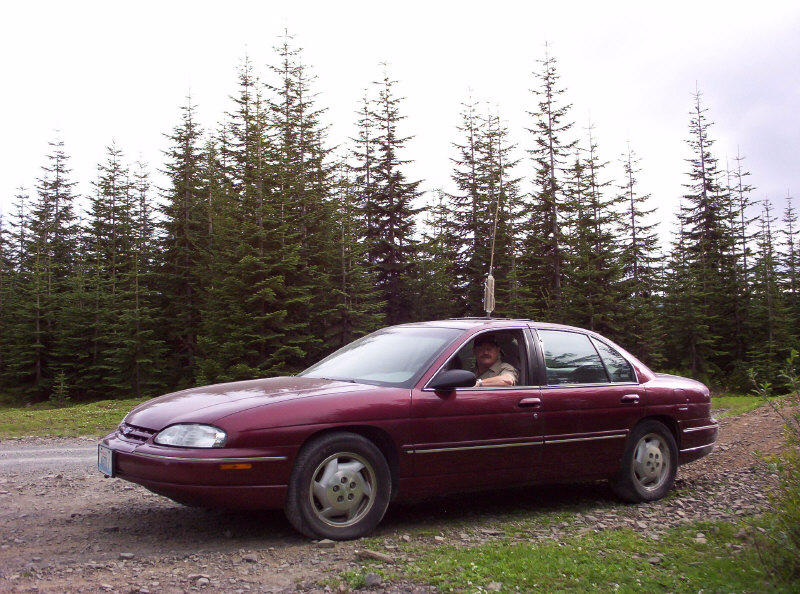
Fig.1
If you would like the text to be larger on the QSL card, you will have to start with an image that has a lower resolution, or smaller pixel dimensions when cropped. Donĺt go too low, or image quality will suffer. Be sure to keep the ratio of width to height the same, or the image wonĺt print properly. It is easy to calculate the proper pixel dimensions to maintain the proper ratio. For example, suppose you want to use an image that is 1280 pixels wide instead of 2000. Multiply the new width, (1280) by the old height, (1270). Take the result, (1625600) and divide by the old width (2000). The result is the new height (812.8) or (813). The new image will be 1280 X 813 pixels and will still print a 5.5" by 3.5" image. Well OK, not quite. 5.5" by 3.49", but who is going to quibble over .01". If you must resize the original image to make it smaller, use caution. Be sure to keep the aspect ratio the same, and make sure the overall image quality is the same. Older photo editing programs have a tendency to introduce errors in the resized image that will be obvious when compared to the original. When using high resolution cameras, it might be easier move the camera away from the subject. This will allow the subject to be a reasonable pixel size when cropped. Referring to figure 2, you will notice that the selected area for the example QSL card is 1675 by 1064 pixels.
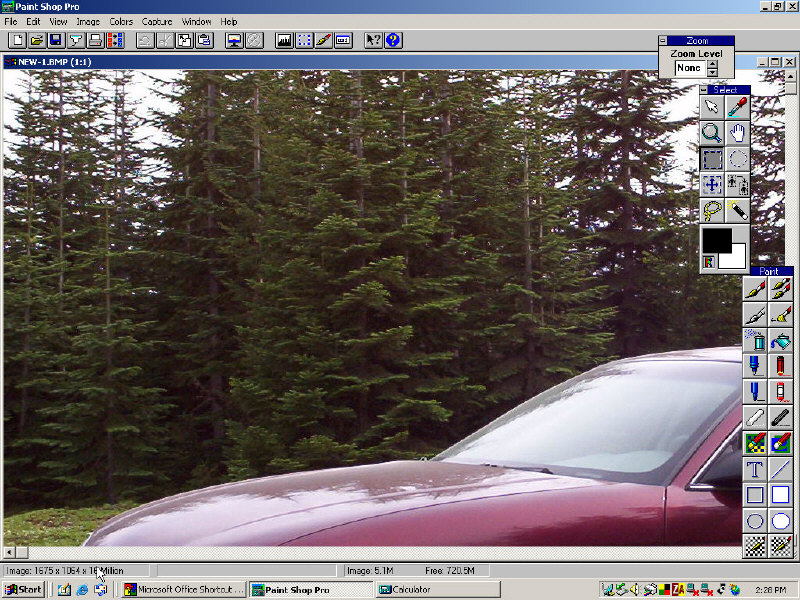
FIG.2
Once you have the image in the resolution you need, verify that it will print at 3.5" by 5.5". Use your photo editor and select a sheet that is 4" by 6". 3.5" by 5.5" photo quality paper is next to impossible to get and besides, most photo editors support 4" by 6" photographs. Lay out the page so that the width is 5.5". Ideally, the photo editor should show a height of 3.5". See figure 3. Once this has been verified, it is time to add text and create the area where the QSO information will be placed.

Fig.3
On many QSL cards, the QSO information is on the bottom portion. For this example, we will follow this convention. Prior to proceeding, make sure the background color is set to white. From the bottom of the image, cut out a section that will result in a white bar that is approximately .5" when the card is printed. Perform a print preview to make sure it looks right. Perform an "undo" and try again if it isnĺt.
To make the letters stand out better use bold text. Add the appropriate text at the top of the white bar. The font size used will be determined by the size of the image being used. Refer to figure 4 for suggested text.
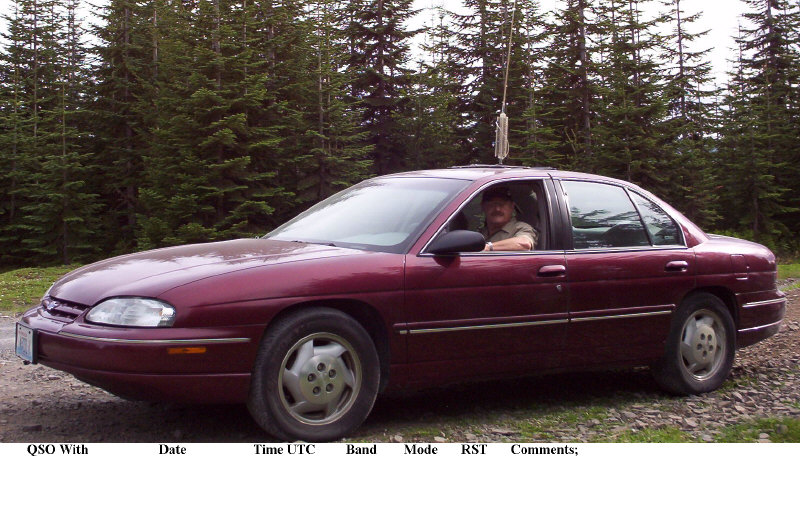
Fig.4
Now add the contact information, Name, address, call, etc. In our example, the name and address is on the left side of the QSL card and the call is on the right. See figure 5. If you want the text to be larger on your QSL card, use a smaller starting image size.
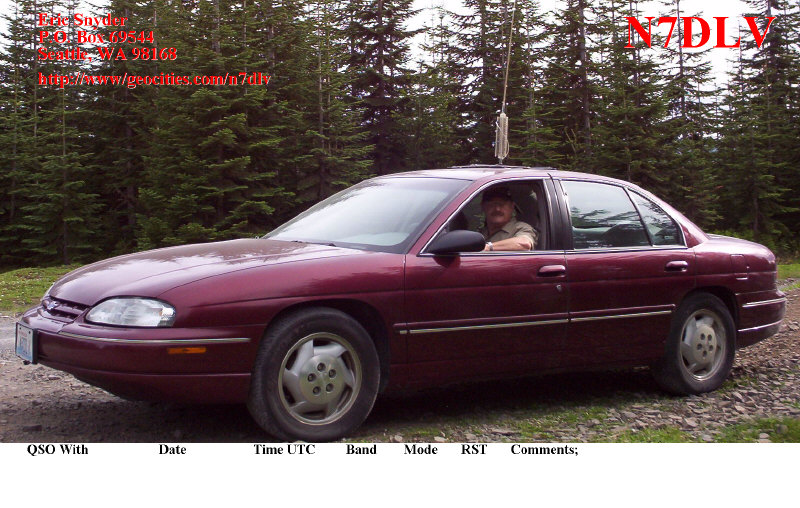
Fig.5
To make sure everything is correct, print a test QSL card. Place a 4" by 6" sheet of paper in the printer and set it up for 4" by 6" paper. Make sure you lay out the page for a 3.5" by 5.5" image. If your printer has a print preview function use it to ensure things look OK. Do not set the photo editor or printer to fit the image to the page or sheet. If you do, the final test print will be too large. When you are satisfied your printer is set up properly, print the test card. Trim the printed card to 3.5" by 5.5" and admire your work! Whenever you need a custom QSL card you can print one.
HINT! Itĺs easy to add the QSO information prior to printing the QSL card. Just add the appropriate QSO text and print the card. If you have more than one card to print just do an "undo" and enter the new QSO information and print it again! Be sure to do another "undo" operation before quitting, or you may have a QSL card that has your last QSO on it.
ANOTHER HINT! If you use card stock and not photopaper, you can place the QSO information on the reverse side of the QSL card and use the entire front side for your image. Most photo editors allow you to create a new image. You can add and manipulate text and objects to create mailable QSL cards with the QSO and mailing information on the reverse. An initial image size of 800 by 508 pixels was used. A word of note; If you do this, be sure to orientate the card stock properly. You may even have to turn the reverse side image upside down prior to printing it. If you are not careful the images will be offset from each other by .5". See Figure 6 for an example.
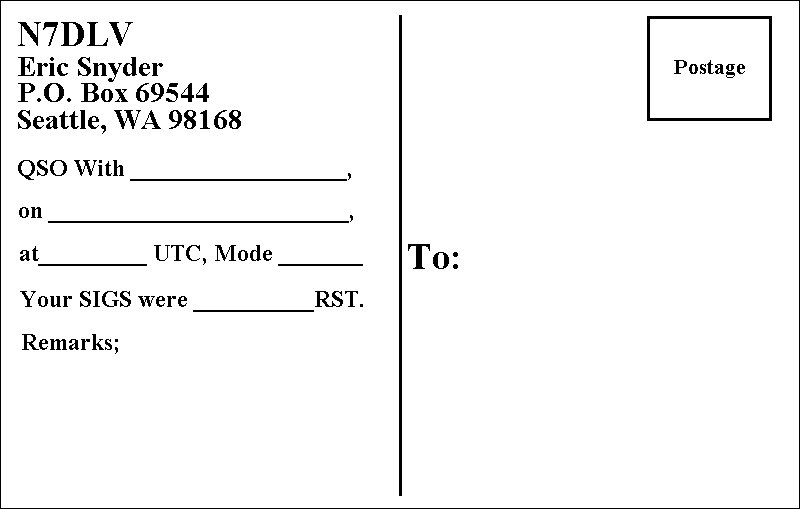
Fig.6
ANOTHER HINT! You can save printer ink and some money, if you have your QSL card printed at a photo center. The drawbacks are, you will have to hand print the QSO information. Also you will have to modify the QSL card so that it will remain 3.5" by 5.5" when printed by the photo center. Most photo editors allow you to "enlarge the canvas". Enlarge the canvas so the final image will be 4" by 6". There will be a white bar to one side or the other and on the top or bottom of the QSL card. If you forget to "enlarge the canvas" the photo center will enlarge the image to fit the 4" by 6" photo paper. Some photo centers can not process .BMP formatted images. You will have to convert your modified QSL card to .JPG format before taking it to the photo center. Copy the modified QSL card to a flash drive or other removable media card. Take it to a photo center and print a test photo. The photo center may crop the image slightly when printing the card and if it is two sided, may not print the reverse side. The text may be cut off slightly if it is too close to the edge of the original image. Be aware of this and place the text further from the edge if you have the photo center print your cards for you. When you receive the cards, just cut them to 3.5" by 5.5" and enter the QSO informaton.
I hope this information has been helpful. If you have any questions, send me an E-Mail and I will try to answer them for you.
Please respect my copyrights and do not copy these instructions and or images for your own personal or clubĺs website. You may provide a link to this webpage. An exception is hereby granted to the Mike & Key ARC. They can reprint this article in the Mike & Key Newsletter and copy these instructions to the Mike & Key website as long as the article is copied in itĺs entirety including the copyright information.
Back to the Main Page
Copyright ę 2007 by Eric A. Snyder. All rights reserved.